DIY Sod Installation: An Easy-to-Follow Guide for Homeowners
If you're looking to enhance your outdoor space, DIY sod installation might be the perfect solution. With the right preparation and approach, you can establish a lush, green lawn that adds value to your home. Before you commence, however, there are essential factors to think about to secure success. Let's explore the steps you need to take to create a vibrant lawn that you can be proud of.
Selecting the Ideal Type of Sod for Your Lawn
When choosing the right type of sod for your lawn, how do you determine which variety will thrive in your specific environment? Kick off by considering your climate. Hot-season grasses, such as Bermuda and Zoysia, thrive in warm, sunny regions, while cool-season grasses, including Kentucky Bluegrass and Fescue, do better in cooler temperatures. Next, think about sunlight exposure. If your outdoor space gets complete sun, you can select a more extensive range of options. However, shaded locations often call for specialized varieties. Also, examine your lawn's use; if it experiences high traffic, you'll want a durable type. Finally, speak with local gardening centers or extension services to get guidance based on your region. Selecting wisely now will produce a lush, healthy lawn later.
Prepare Your Yard: Soil Testing and Site Prep
Prior to laying sod, it's vital to prepare your yard properly, commencing with site preparation and soil testing. Initially, assess your soil's pH levels and nutrients with a basic kit from your visit now neighborhood garden center. This will help you identify what supplements your soil demands for optimal growth.
Next, remove any old grass, weeds, and debris. If necessary, employ a shovel or a sod cutter to eliminate existing grass and roots. Next, till the soil to a depth of about 4-6 inches, allowing for better drainage and root penetration.
Lastly, smooth the soil to produce an even surface, guaranteeing good contact between the sod and soil. Following these measures will give your new sod the best chance to prosper.
Necessary Equipment and Materials for DIY Sod Installation
Gathering the right tools and materials is essential for a successful DIY sod installation. Commence with a sharp spade or sod cutter to remove old grass and prepare the area. You'll also need a rake for smoothing the soil and a shovel for digging. A garden hose or sprinkler will help you ensure proper irrigation after laying the sod. Don't forget a measuring tape to map out your layout accurately.
When it comes to materials, purchase quality sod that suits your climate and soil type. Furthermore, grab some topsoil or compost to improve your existing soil, and consider a roller to flatten the sod once it's laid. Having these tools and materials ready will make your installation process easier and more streamlined.
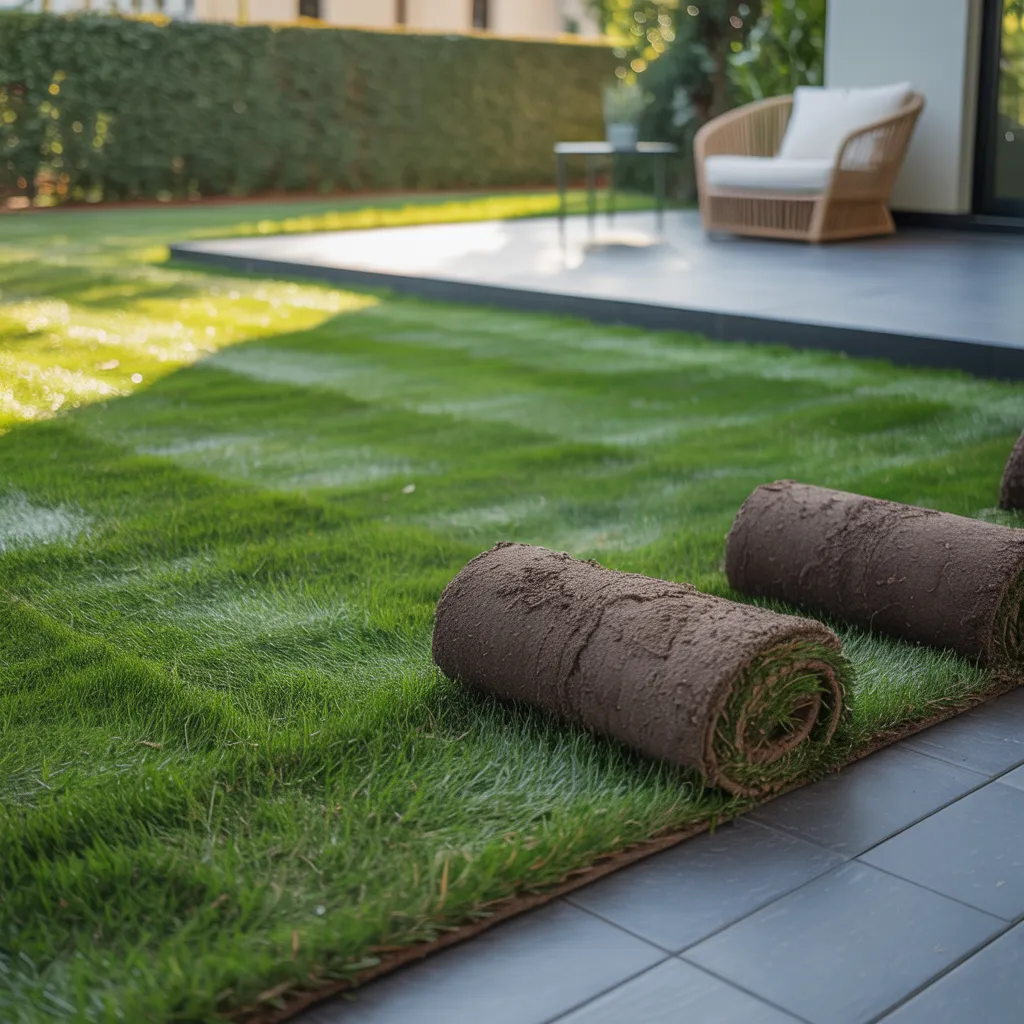
Detailed Walkthrough: The Process of Laying DIY Sod The Professional Way
Installing sod can turn your yard into a verdant, green paradise in only a few hours. To start, prep the space by removing debris and evening out the soil. Then, dampen the soil a bit to assist the sod in taking root better. Begin placing the sod along a straight line, offsetting the seams similar to bricks. Press the edges together firmly to eliminate gaps. Use a sharp knife to trim any excess sod at the edges. After laying, roll the sod gently with a roller to guarantee good soil contact. Irrigate the sod right away, saturating it completely. Keep the sod moist but not soggy for the first couple of weeks. Follow these steps, and you'll have a beautiful lawn in no time!
Key Maintenance and Watering Suggestions After You've Finished Laying Turf
After you've properly installed your sod, correct watering and upkeep are crucial to making sure it establishes roots and flourishes. Commence by watering your fresh sod right after laying it, soaking it thoroughly to stimulate deep root growth. Over the first two-week period, keep the soil consistently moist, irrigating once or twice daily if it's hot and sunny. Following this period, reduce watering to two to three times weekly, according to rainfall and temperature. Be certain to cut your sod once it hits about three inches tall, but refrain from cutting more than one-third of the height at any single cutting. In conclusion, apply a starter fertilizer after around four weeks to supply your new grass with essential nutrients to flourish.
Troubleshooting: What to Do If Your Sod Won't Establish?
When your sod doesn't take root, it's time to diagnose what's wrong. First, assess soil moisture levels, as overwatering or underwatering can hinder growth. Following this, inspect for pests and assess sunlight exposure to verify that your sod gets the proper environment to flourish.
Assess Soil Water Amount
How do you determine if your soil contains adequate moisture for sod to flourish? Begin by checking the soil manually with your hands. Dig down about an inch; it should feel moist but not soggy. Dry conditions can prevent your sod from establishing a strong root system. Irrigate the space well and allow a few days to pass before testing again. If you see puddles or mud, you may be overwatering. You can also employ a soil moisture meter to obtain precise readings. The goal is to maintain soil that stays moist while draining properly. Adequate moisture ensures your sod establishes roots and develops vigorously, creating the basis for a verdant lawn. Modify your watering routine as necessary to achieve optimal outcomes.
Search for Pests
Examining for pests is vital when your sod fails to take root properly. Start by examining the grass blades and soil for any signs of insects such as grubs, chinch bugs, or sod webworms. Watch for patchy patches, discoloration, or dead spots, which could indicate an infestation. If you detect any pests, act quickly. You can use insecticidal soap or neem oil for a natural approach, or go for chemical treatments designed for specific pests. Furthermore, check for indicators of disease, like fungus or mold, which can also affect your sod's health. Don't overlook to inspect the nearby area, too, as pests can easily transfer from nearby plants. Resolving pest issues quickly will help your sod thrive.
Review Solar Exposure
Are you sure your sod is receiving enough sunlight? If your sod isn't taking root, inadequate sunlight may be the culprit. Most grass types do well in full sun, needing at least six to eight hours of direct sunlight each day. Assess your yard for any shading from trees, buildings, or fences that might block needed light. If you identify areas deficient in sunlight, consider cutting back overgrown plants or relocating sod to a sunnier place. You could also consider shade-tolerant grass varieties if your yard is mostly shaded. Remember, healthy grass needs that sunlight to form deep roots. Monitor your sunlight exposure frequently, and make changes as needed to confirm your new sod grows well.
Is Professional Lawn Care Right for You?
While countless home owners value their DIY capabilities, sod installation can be a demanding project that has you considering if you ought to call in the pros. If you don't have landscaping expertise or can't commit adequate time to the task, hiring professionals might be your best bet. They'll ensure proper soil preparation, precise measurements, and superior installation techniques, delivering a vibrant, thriving lawn.
In addition, if your outdoor space has unique challenges, such as poor drainage or uneven terrain, experts can tackle these problems effectively. Bear in mind, investing in professional help can save you time and frustration, leading to a thriving lawn that boosts your home's curb appeal. In the end, consider your capabilities and schedule against the possible benefits of employing a specialist.
Questions & Answers
What is the Rooting Timeline for Sod?
Sod generally requires approximately two to three weeks to establish proper root development. While the sod is rooting, ensure the soil stays evenly moist, and stay off the new sod to guarantee your new lawn establishes well.
Can Sod Be Installed During Winter Months?
You can't install sod during winter months. Cold temperatures hinder root development, preventing the sod from establishing properly. Spring is the best time to proceed when the environment is better suited for healthy growth.
What's the Best Approach if My Sod Shows Brown Spots?
If brown spots appear on your sod, examine for pests, diseases, or unsuitable watering. Modify your watering schedule, address any problems, and ensure your lawn gets appropriate nutrients. Consistent maintenance will help restore those brown areas.
How Often Should I Fertilize My New Sod?
You ought to fertilize your new sod approximately six to eight weeks after installation. After that, apply a balanced fertilizer every six to eight weeks during the growing season to maintain your lawn healthy and vibrant.
Should I to Edge My Lawn After Setting Sod?
Yes, you should edge your lawn after installing sod. This creates a neat border, improves the aesthetic appeal, and assists in retaining soil moisture. It'll also keep grass from invading flower beds or walkways.